Chevy Nova Forum banner

Rear Window Channel Replacement 1970 Nova

5.5K views 12 replies 6 participants last post by  TheBandit  
#1 · (Edited)
I thought I'd share my experience replacing metal around my rear window using fresh sheet and new channel from www.rustreplace.com aka Belden Speed and Engineering. My '70 Nova is an original vinyl top car and things were getting bad.

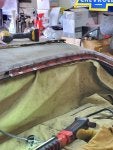
First here are some before images after removing my rear glass and peeling back the vinyl top. I've circled all the holes using silver Sharpie.

Image
Image
Image
Image

Image


I started by running a wire wheel over everything, which opened up new holes in thin areas I hadn't seen initially. I also poked around with a screw driver to find more bad spots before outlining areas I would need to patch. I also treated the whole area with Rust Kutter, a phosphoric acid rust converter. Like Ospho or Krud Cutter, this uses phosphoric acid to convert iron oxide (rust) into more stable iron phosphate. It left a white residue on everything which I will have to clean off before painting.

On the lower area, I decided to patch areas with cut pieces of sheet metal rather than replace the entire panel. I cut the rectangular pieces of 20awg sheet first then used a scribe to transfer the exact shape onto the old panel. Finally I cut it out with a combination of a body saw and a Dremel with a tiny cutoff wheel.

Image


I used Eastwood stitch weld magnets to hold the patch pieces in place while I tack welded. These magnets are very strong and quite useful, but I found you have to be about an inch away from them otherwise they interfere with the weld and cause weird spattering.

Image


Image


A couple of these required bends like along the lower edge of this patch where the original bent area was rusted away. It's important to cut out all the margins of the rust otherwise the weld will just blow through. You can see there is also a small rust hole next to this patch which could be welded shut without a patch.

Image


For the upper and side channels, I bought pre-fabricated pieces from www.rustreplace.com. These have already gone through a shrinker to get the curves, but they have to be trimmed to fit. This is what a couple of them look like prior to trimming.

Image
 
#2 · (Edited)
The pieces were not made long enough to patch the corner of the trunk panel area, so when I ordered them I asked for a small length of extra metal that I could used to patch here. This area was tricky because there are spot welds that join three layers of metal. Most of the spot welds had to be removed with a spot weld cutter, but I also found some of them, especially at the upper roof area, could be split with just a body knife / panel separator.

Image


I used the following steps to fit the new pieces:
  1. Determine the area to be replaced
  2. Start by doing a rough cut about half way down from where the channel meets the roof or quarter panel. This removes the trim studs and leaves an overhang of metal to scribe against
  3. Use a panel separator along the bottom of the channel to find and separate or drill out the spot welds to remove the rough section. I used a Lisle 51900 Spot Weld Chisel which cost about $16 and some spot weld cutters from Harbor Freight. This leaves something like the following photo:
Image


4. Clamp the new piece into place. Use lots of clamps because it makes a difference! At this step you will have the cut the ends to match the radius of the window frame.
Image


5. Decide how much to trim off the edge of the new channel. For most of these I scribed off about 1/8" or more and removed it from the upper edge of the new piece so the weld would be a little below the radiused corner. I used an angle grinder to remove the material
6. Clamp the piece back in place and scribe a cut line into the original metal of the car.
7. Use a body saw to trim carefully along the cut line.
8. Clamp the piece in place and carefully fit it to the new cut line. Use a file in places where it doesn't quite fit.
9. Once the piece fits while clamped and there is little or no gap along the edge, it can be welded into place
10: Finally use a flap wheel and/or sanding disk to clean up the welds

Image


I repeated this process around the top and sides

Image


Image


Image


Here is the nearly-finished product:

Image


Image
 

Attachments

#3 · (Edited)
So a few thoughts and tips now that I have everything welded in:

Safety
Ear protection. Eye protection. Welding/heat protection. Fire extinguisher nearby at all times. BE SAFE!

Do you need to remove the headliner?
This is a tough question. On my car I have a 1pc fiberglass headliner from TMI and I left the headliner in place for this entire project. The headliner is spaced about 3/4" below the channel so it does not get direct heat from welding. The main concern is if weld slag or sparks are thrown under the roof panel and burn through the headliner, which I think would be a bigger concern for an original style bow headliner. With an original headliner, it is probably safest to remove the headliner, but that would require replacing it with a new one anyway, so I would probably leave it in place knowing you may have to replace it if it gets damaged.

How do you protect the interior?
I used a welding blanket clipped along the edging for the windlace just below the headliner and then draped over the package tray. This keeps crap out of the car and then I used a shop vac periodically to clean up metal dust.

Rust Treatment
Rust conversion is an important step to stop further spread of rust. I used Rust Kutter in a spray bottle for rust conversion, but I'm not very happy with how much white residue was left afterwards. I don't know if Ospho or another rust converter would do a better job.

Cutting
I made most of the cuts using a body saw, specifically an Ingersoll Rand model 429 that I bought for this project. I loved this tool and found it worked really well for following scribed lines. However I also had to use a Dremel tool with a very small cutoff wheel to get some of the shorter cuts like when cutting across a channel rather than along it. For cutting the channel to length, a conventional 4" angle grinder with a cutoff wheel or a band saw would also come in handy (I used a band saw)

Spot Welds
I hate cutting spot welds, but it is what it is. I found a body panel separator was really useful. It is a thin chisel-like tool that can be hammered in between the panels and then along the panel to find the spot weld. The specific tool I used is a Lisle 51900 Spot Weld Chisel which cost about $16. The spot welds can either be drilled out using a spot weld cutter or, if the weld is small, it can be split apart just using the panel separator. On my car I had to drill out all the spot welds along the quarter panels, but the roof spot welds split apart easily with just the panel separator and a few strikes of the hammer.

Fitting
I can't stress enough the importance of clamping and then using a scribe (not a marker!) to get accurate fitment. Doing it this way I found the pieces fit nearly perfectly on the first cut; occasionally I would file a few areas. To help see scribe lines, you can mark the area with Sharpie or layout dye first, then scribe. Use a work light to make sure you can see well while cutting. If you take your time here it will make welding a lot easier.

Welding
I used a Millermatic 180 MIG welder. Just about any MIG welder should be capable of welding sheet metal, but there are a few things you can do to make it go more smoothly. First I recommend using a smaller wire 0.023. This will require the appropriate size contact tips and using the right drive rollers. I've done sheet with 0.030 and it's just a lot easier to burn through while 0.023 is more forgiving. Sheet is not welded in continuous welds; you have to do a series of overlapping spot welds and give time for cooling in between. Watch some videos on YouTube - there are lots of great tips for doing this. Of course it's also important that you clean the sheet metal and remove any paint; for that I prefer to use a flapper wheel on the angle grinder, but it's also important not to thin out the material, so a light touch to get to bare metal is all that's needed. Finally, after the welding is all done, you can use a flapper wheel or sanding disk to clean things up.

Replacement Channel
I purchased the replacement channel pieces from www.rustreplace.com aka Belden Speed and Engineering. Alternatively you could make them from scratch using bent sheet metal and a shrinker, but this takes some skill. I was very happy with the fit of the pieces provided by Belden - for the price I think they are well worth the time savings and I also found they were very helpful by email.

Trim Crip Studs
I have not yet replaced the trim studs, but there are three options for doing so (1) screw in studs (2) rivet studs (3) weld in studs. The factory used weld-in studs, but they require a stud welder and an appropriate contact tip/holder to weld them in place. The cheapest option is screw in studs, but I opted against these because they can strip out of the thin metal. I purchased rivet style studs from Belden and their instructions include measurements for locating them. They also sell the trip clips if you want to get everything from one place.

Paint
I have not gotten to the paint stage yet, but I intend to use a 2K epoxy primer. You can get these in an aerosol now from Spray Max or Eastwood or you can mix and spray with a paint gun.

Other options
The side and top channels are originally part of the quarter and roof panels respectively. If you need to replace those panels anyway, you may want to do that instead. My car needs new lower quarters and I probably could have replaced the whole roof panel to address other rust issues, but I want to save as much original sheet as possible and just replace what's needed. Choose your own adventure!

Cost
Cost was pretty reasonable on this. I spent about $200 on materials (3 channels, rivet studs, and trim clips) from www.rustreplace.com and of course used some consumables and tools along the way. Tools I didn't have included the body saw ($80 from Amazon), panel separator knife ($16 from Amazon), and spot weld cutters ($10 from Harbor Freight), and extra vice grips for clamping (about $40 in total).

Time/Effort
I've spent a lot of hours on this, but it's very hard for me to estimate since I did the work in small chunks over a few months between other demands of life. On one of my last pieces, AFTER I had learned from the previous work, I spent about 4hours start to finish cutting out, fitting, welding, and grinding just one of the channel pieces. If you factor in the time to research, buy materials and tools, and learn while installing everything, I imagine this is a 40+hr project and could vary wildly depending on your experience and patience.

Overall Results
In the end I'm really happy with the finished product. It looks like the window trim will still fit well, the edges are good enough for paint, and the channel is back to new condition. I expect the glass will sit properly and seal properly, but we will see when I finish.
 
#4 · (Edited)
Hello Clint . . . . A very good "write-up" : both info about finding those new parts & the tools needed. (y)

The "How-To" ; was also very good ; and I would say - - 'if you do your own work (like engine & trans) , then this would be in your "wheelhouse" .

For my 69 car - - I am sure that I have this very same "issue" (at maybe one or two areas , around my back window - also. (My back window (maybe) , also leaks water into my trunk).
My trunk rubber weatherstrip , is long gone (and could be some source of water).
So, for myself - being an old (or OLDER) bodyman ; I do think this task is very "doable" . . . but great info , does makes everything much better . .

Thanks for taking you time too do u'r write-up . Now I have a good 'need' ; to buy that new wire welder - (I do like the 'Millermatic 180) .


Far sure - I'm checking out " Belden Speed " . :) :cool:


jim


and, Happy New Year - 2024 .
 
#8 ·
Update: I managed to complete the remaining roof repair, paint everything, and reinstall the rear glass. I chose to strip the roof down to bare metal to get rid of any rust. Instead of epoxy primer, I decided to use Mastercoat Permanent Rust Sealer and their AG111 top coat. There is a great video on YouTube here demonstrating it's rust prevention capabilities. This was my first time spraying with an LVLP gun and it was a great learning experience. I predrilled the trim clip stud holes before painting, then when I installed the pop-rivet style studs, I used a dab of seam sealer on each of them to make sure they did not leak.

Nothing about this job was perfect, but I am really happy with the results.

Image


Image
Image


Image
Image


Image
Image


Image


I want my kids to experience rust repair some day, so I will be reinstalling the vinyl top once I get through a few other projects inside the car.
 
#9 ·
Clint, I do hope that everything is going good , for you . So, at this point ; it's looking like I'm joining you (Survivor Status, 2years in) AND 'Rust repairman' .
Again, Thank You for a very well written ' Rust / Repair / Channel ' write-up. Great job, and well done. Also, for the "rustreplace.com" 'connection' . . . . I had seen that 'site before' , but
forgot too save that info.
For me - - this will be "remembering those old days ; in the body shop" . . . . so, will be (for me) a good 'adventure back , when I was (really) younger' .

Stay safe out there, in SoCa .

jim
 
  • Like
Reactions: TheBandit
#11 ·
So, at this point ; it's looking like I'm joining you (Survivor Status, 2years in) AND 'Rust repairman' .
Wow Jim - two years just flew by! So very happy for you. Being a survivor is a big deal. Congratulations! Enjoy life with that new perspective. 🍻