Chevy Nova Forum banner

72 Nova complete restoration

8.6K views 28 replies 10 participants last post by  72'350Nova  
#1 ·
Hey Gentleman! I inherited a 72 Nova from my mom about a year and a half ago, after telling her for over 10 years that I wanted her car. In all, I've only moved it from my parents house in Southern California, to my house in Phoenix, AZ, and then a short move from there to my house about 5 miles from the previous.

Details about the car:

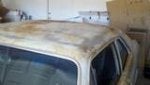
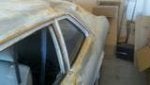
2-Door, bucket seats in front, automatic, 350 small block, not running since 2002. It was in an accident in 2001 and the rear drivers side is pretty mashed up (all body work, somehow didn't break the taillight plastic). Because of that, rust has formed in the area. There's also a fairly significant hole in the D-Pillar due to rust on the drivers side, and a small one in the same spot on the passenger side. Other than that, the rust is on the surface... so no big deal. The interior is done haha. It needs to be replaced, so that will be completely done.

The idea I have is to make it a show car, not driven more than maybe once a week on the weekends, and not a lot of miles once that is true. Where I'm stuck right now is where to start. I'm going to be making some room in my garage so I can pull stuff apart as needed, but I don't have enough to pull off the entire outside parts. I would like to pull everything off, and send it all out for media blasting so I know what I'm in-store for, but the exterior is only primed and not painted. So I don't even know if I should consider sending out the body for that, or just go ahead and begin to sand it. Not sure if I should pull everything out of the interior first, or start working on the exterior first. Or if I should worry about pulling the engine out and start working on restoring that. Any tips would be helpful. Thanks!
 
#5 ·
I'm in the middle of a full resto on my high school Nova. I think I'd approach it like this:

1) Get a decent electric orbital sander (DeWalt/Bosch) and a couple 50 packs of 80 grit DA paper. Sand the body down to bare metal. It will take a lot of time and get one of the hard parts out of the way without breaking the budget. If you have the room, pull the front end off of it and pull off all of the take off parts - doors/fenders/hood/etc. This will get you better access to work and then you can spray them separately when the time comes.

2) Assess the damage - acquire a Mig welder - Lincoln 140, Hobart Handler, Eastwood, etc will all be fine. Shoot for one of the bigger 110V's if you can.

3) Sheet metal work as required

4) Acquire a decent air compressor, the harbor freight "professional" purple spray gun set, set the compressor up to spray with a separator/filter. Epoxy, Body Filler, Epoxy, 2k high build, block it down, Epoxy as sealer, basecoat, clearcoat. Cut and buff when you have the chance later on.

5) Tear apart the mechanicals - engine, transmission, suspension, etc. Do the back suspension/brakes/rearend/transmission first, then the front subframe/engine/etc. Wire wheel everything, clean up the rust proofing and use a rust converter like Por 15 or epoxy primer and semi-gloss to flat black.

6) Rebuild engine/transmission as required. At minimum, basic tune up parts.

7) Rebuild front suspension and brakes, including control arms, springs, shocks, brake lines, etc.

8) Interior - carpet, dash, gauges, seat covers, etc.

9) Reassemble everything, weatherstrip, final pieces, wheels, etc.

10) Step back and be ridiculously proud of what you accomplished

Make no mistakes - this is going to be a lot of work and a lot of money. But eat one ear of the elephant at a time, divide into little subprojects, take a break from it every once in awhile and don't get frustrated. With these old cars, literally EVERY problem anyone has ever had has been discussed in a car forum at some point, or someone smart on those forums can help. So you're not alone.

Have at it!

Kev
 
#15 ·
I'm in the middle of a full resto on my high school Nova. I think I'd approach it like this:

1) Get a decent electric orbital sander (DeWalt/Bosch) and a couple 50 packs of 80 grit DA paper. Sand the body down to bare metal. It will take a lot of time and get one of the hard parts out of the way without breaking the budget. If you have the room, pull the front end off of it and pull off all of the take off parts - doors/fenders/hood/etc. This will get you better access to work and then you can spray them separately when the time comes.

Kev
Thanks Kev, would you recommend a 3A sander? or would smaller draw do the trick?
 
#7 ·
The first thing I would do is take as many high resolution pictures as you can and then take even more to where later you have something to use as a reference. I can guarantee you will never remember what bolt went where, how long it was, and if it had a washer or something else on it.

If you do start taking it apart, bag the parts and tag the parts.

As they say, they are only original once.

Jim
 
#8 ·
Good advise Jim.

I think he can get away with hanging a quarter panel on it and banging the rear valence back out (or welding a new one in if required). Looks like it was hit a little high to do much damage to the trunk drop offs or floor pan, but you'll want to look at those closely as you survey the damage.

Kev
 
#9 ·
I appreciate the feedback. It is definitely helpful. I had actually considered getting a circular sander to get down to bear metal right after I brought the car home with me. This is my first ever attempt at a restore, and mostly going to be a first attempt at majority of the items to be done (unfortunately my dad didn't teach me a lot about cars growing up, I've just picked up things as I've gone along and I feel I am mechanically inclined). I asked my dad, who was a mechanic for a long time, what kind of sander he suggested, and he told me it was best to do it by hand to avoid going through the metal. But I suppose I do have the ability to ensure I don't press too hard, while removing surface rust.
I don't think I have the room to pull the front end off completely, and store it.
I am going to do some work in the garage to be as efficient as possible with space though, and go from there.
I have started reading a restoration book, to help give me an idea. But believe me, I will take your experience over my reading any day of the week =)
 
#10 ·
Oh, I also have 0 experience welding. I do have an acetylene torch in the garage though, so I can cut as needed (after practicing) and it is my understanding with the right mixture you can also weld with it.
I have a family friend who did car building for a long time, and he told me "think of how much you want to spend to fix up the car. Okay, now take that number and double it... That will put you closer to how much you'll spend." Haha.. I take that to heart
 
#11 ·
That looks like a lot of surface rust and a light coat of paint. You'll want to go to bare metal. It will be pretty easy. It's fine to show through to the metal, the epoxy primer will dig right into the 80 grit scratches and leave you with a smooth starting point. Doing it by hand will be killer and won't eliminate most of the surface rust.

I don't think you can weld with that torch, you're going to need a stick welder (arc), mig welder (flux core or gas) or tig (fancy, expensive, gas). Most home hobbyists like a mig for restoration work. Be careful with the torch, there's not a heck of a lot you're going to need that for unless you're doing rough panel patches.

Kev
 
#12 ·
I had 0 welding exp when I bought my millermatic 211 and relied on the auto set feature from the begining now I dont even have to think about it and just go from feel and sound

the 211 is awsome it goes for around 930 and its 110 or 220 I run it on 110 and have welded 1/4 plate with no issues on a 30 ft extension chord (cheap chord not a good high amp one)

getting a project is a good excuse to buy tools I talked my wife into letting me buy a bead roller to fix the floors and then ended up just buying replacment pans

Eastwood is a great source too alot of what you will need
 
#17 ·
That would be the way to go as it will also allow you to see what kinda shape other area's are that are currently being covered over. When I was putting on NOS quarters on my 74 I found some inner roof rot by the roof to quarter seam. The inner structure I needed for that had to come off of a donor car but while I had it apart it was one of those things I decided to repair properly and not cover back up.

If you do opt for full quarter replacement, and if you are doing the work, read all you can about doing the work. I ran into a few snags doing mine but nothing that couldn't be worked around.

Jim
 
#19 ·
Quarter panel replacement is a big job, but I think it's required in this case. Your current QP is more or less junk.

I've got this cheap Bosch sander from Lowe's and I really like it. Keeps the dust down, doesn't vibrate like crazy and sands nicely.

http://www.lowes.com/pd_294221-353-...oductId=3735191&Ntt=bosch+sander&pl=1&currentURL=%3**tt=bosch+sander&facetInfo=

A lot of guys like the big 6" buffer/polishers to strip with, but they're about double the price.

Ideally, you'll get set up with a good air compressor and an air powered dual action sander, but you'll need a big compressor to make that work. I also go nuts listening to my compressor for hours at a time, so I really prefer the electric one even if it's slower. Most people prefer the air powered stuff because it's a little faster.

Kev
 
#21 ·
If the framework behind that quarter is good, just do a skin. Same tools, less disruptive to the car. After sanding mine down with a quality air sander and a three rolls of sticky back 80 grit from Westco body supply, I'd take a long look at stripping it to a shell and having it media blasted by a pro. It gets the job done quickly and they have the mess. Three years later I am still dealing with the dust from stripping mine. This after I curtained the garage...it still got everywhere. The body sanding was not nearly the problem.
 
#22 · (Edited)
Update

Took the advice of a couple of people and went out and got myself an orbital sander. Cleared out a large area in my garage and began working on the body today. Did about 3.5 hours worth of sanding and here are some pics to see the progress:

Before:

Front Passenger Fender upper done:

Started on the hood:

Finished most of the passenger side of the hood (this one is hard to see due to me turning off my flood lights prior to taking the picture):


Turns out what I thought was just a primer layer that was down was actually a full blown paint job. There were 4 layers: Grey (outer), yellow (base layer for the grey), primer, and a black layer that I am unsure of what it was.
 
#23 ·
If you want to expedite the stripping process, use one of these discs on an angle grinder:

Image


You can also get those stripping wheels for a die grinder (air tool) or a normal electric drill. I found those little ones to be great for the door jams, inside the fenders and in other hard to reach places.

I run the orbital sander over the last of the primer and bare metal to give the epoxy some scratches to stick to. While a lot faster, those stripping discs throw about 10x the dust as the orbital sander, so just be aware of that (AND WEAR A RESPIRATOR SO YOU DON'T DIE).

Kev
 
#24 ·
Thanks Kev! I'll definitely consider it. As far as the respirator goes, I was looking at the chemical respirator that they sell at lowes, but wasn't sure if it was satisfactory for dust and rust particles as well. The guy working the area was no help, to be honest. So I went with the dust mask with a filter on it. Thoughts?
 
#26 · (Edited)
Recently moved back the Western WA, after my wife had expressed extreme displeasure with living in the heat of Phoenix. Brought my car up, and stored it in my sister-in-law's garage. Recent events had my SIL tell me that she would be moving out of that house, leaving me with no indoor location to store it. Fast forward a bit, I convinced my wife to allow me to get the body work done, completely sandblasted, and protected for winter outdoor storage. I do this knowing that I will likely have some rework that will be required, but better that than the alternative of lots more metal being eaten through.

Decided to do some of the dis-assembly myself, to save a little bit of money. Asked a co-worker to come over and give me a hand, and this is what we did:

Started off by using a little bit of rust penetrant on bolts on the hood, and removed that. 4 bolts in total that connected the hood to the brackets.

Next decided to tackle removing the door windows on either side. After removing the inner panels, which had a combination of screws and clips, had to disassemble the parts within the door that would interfere with the glass removal.
here is a picture of the window crank after the handle was removed. Mind you, the inner door latch and window crank handles have small clips on them, shaped like horseshoes, that must be removed to remove the handles themselves.
a picture of the actual mechanism that moves for window movement aside from the handle.
here is the inner door latch. If you look along the door, you see many bolts. I'm convinced that you don't have to remove them all, but I went ahead and removed every bolt and piece of equipment inside the door, aside from the locking mechanism, to remove anything that could get in the way.
this is the locking mechanism. The bolt right below it needs to be removed, as it is part of the lifting mechanism for the window (which does need to be removed to take the window out).
as you can see near the bottom, this is my co-working holding the window for me. That track is what the wheel of the operating mechanism rolls on (you have to slide that wheel out of the end of the track, to fully remove it).
looking down the door to where the window is, you can see you have a good deal of room to be able to remove the window without removing that bottom track (initially, I thought this had to be done. Figured out it wasn't required though).
this is arguably the most important picture of the entire thread so far. That one bolt caused much confusion, many minutes on youtube, a few cuss words, and at least 3 drinks of a beer. That bolt needs to be removed, to remove the stop that it's holding on to, in order to drop the window down far enough to maneuver around the tracks it slides up and down on. Do yourself a favor, remember to remove that bolt and save yourself probably an hour.
Here's a picture of the window operating mechanism. Fairly simple to take out, likely to be a pain when putting back in, though.
Here's the bread and butter. All that small, tedious work to get to this point. Picture is sideways, but if you look closely: you'll see the door lock there. One important thing to note: had to bend the brackets down near the bottom to be able to move the window out of them. Once we did that, turned the window sideways and out she came.
Here's that bracket I had to bend slightly to get the window out. It runs all the way up the door to the top of the door frame, and the window slides along it (closer to the front of the car).
 
#27 ·
On to the front bumper we went. Took a look at it, noted there were 4 bolts holding it on underneath, decided to tackle those to try and make it all work.

Here is essentially what you're removing. The bottom side of the bolt was 5/8", top side was 11/16". No guarantees that these weren't aftermarket parts, though. Found that the outer 2 of these were much more rusted and took a heck of a lot more force to remove (insert air driven impact wrench that I don't have please). Got 3 removed, broke the 4th.
Noted that the bumper wasn't flexing much, and must be bolted down in other places. Found 2 other spots that we could choose from to try and break it loose, and decided initially to attack these guys. what they look like inside the bumper. this is what they look like on the outside. The nuts were 11/16th. Removed the 2 central bolts, but then struggled with the outer 2. If you go to do this, you'll need deep well sockets, or a 3" extension (neither of which I had - most of my tools are in storage, since I'm currently living at my mother and father-in-law's place). The angle necessary to attack these nuts are just perfect that my 6" extension made it impossible to attack, and a normal socket wasn't cutting it for being able to get it on the nut.

That was the end of the day yesterday. Felt like some progress was made, albeit not a ton of it. This was over about 3.5 hours. Also was able to finally get the car up on jack stands rather than sitting on the ground.

Thanks for reading.
Sam